Spring Security를 이해한다.
Goal
- Spring Security란
- Spring Security 사용법
- 1) 필요한 Library
- 2) Spring Security 활성화
- 3) Spring Security 설정
- (참고) Expression-Based Access Control
- (참고) Custom Login/Logout Form
- Spring Security Architecture (전체 과정)
Spring Security란
- 스프링 기반 애플리케이션의 보안을 위한 사실상의 표준
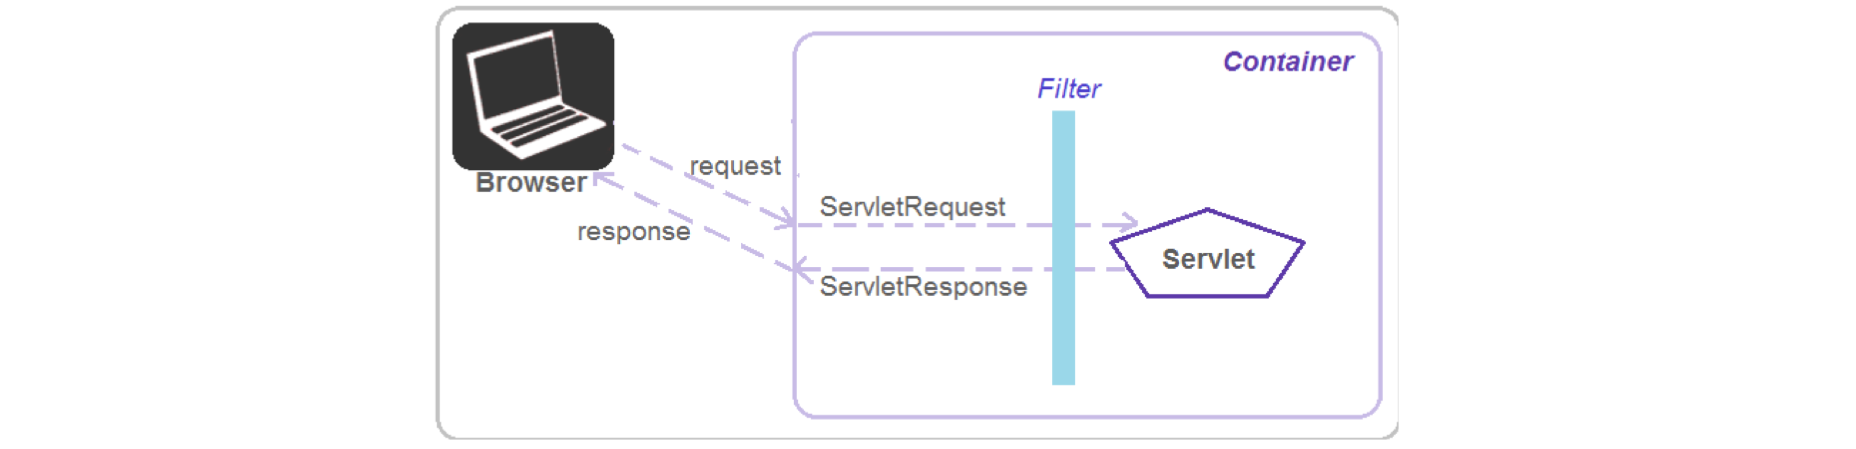
- Spring Security는 전적으로 Servlet Filter를 기반으로 한다.
- Filter는 (Servlet과 브라우저 사이에서 주고 받는) 요청과 응답을 가로 채고, 해당 요청/응답 전후에서 필요한 처리를 할 수 있다.
- 사용자 정의가 가능한 인증 및 접근제어/권한 프레임워크
- authientication(인증): id/pw, 공인인증서 등
- authorization(권한): admin, user, guest 등
- 간략한 과정
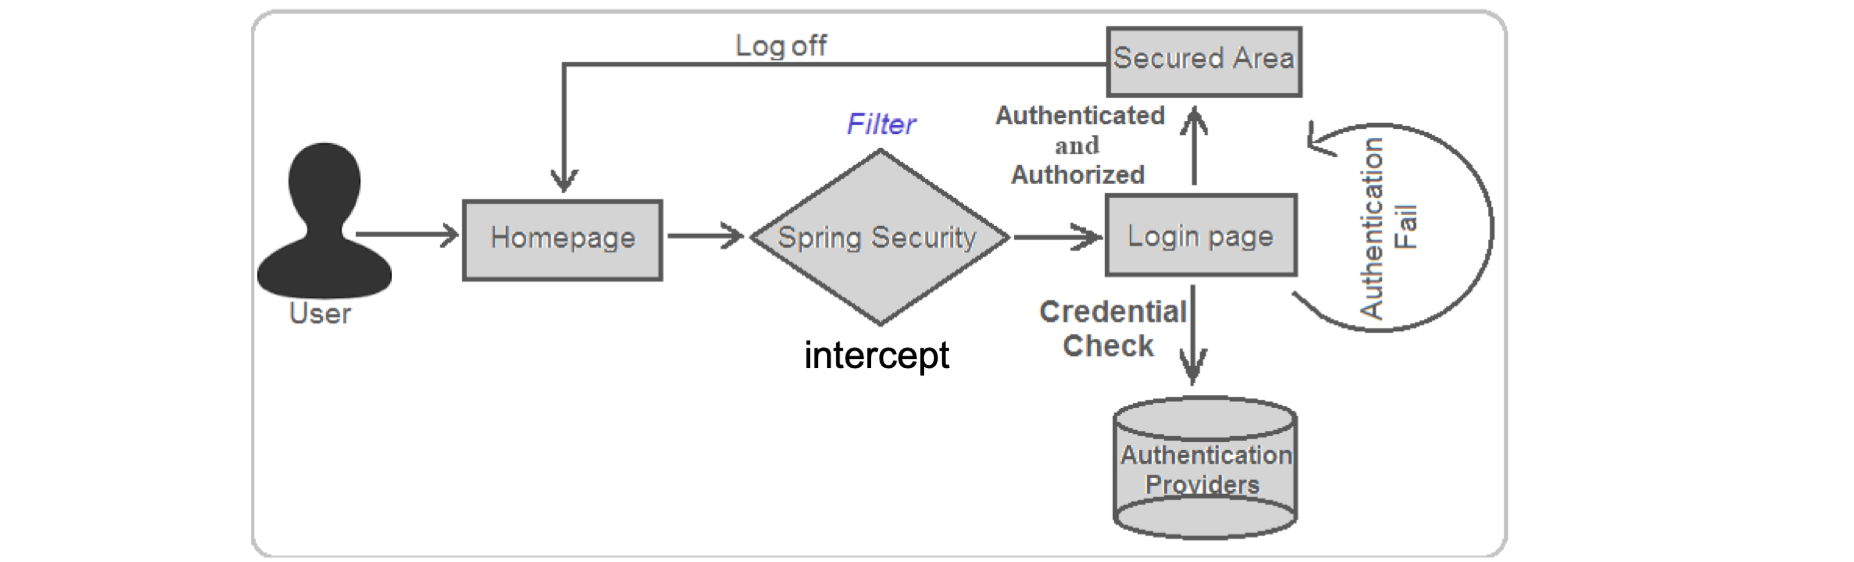
- Authorization(권한): 권한이 없는 User가 접근할 경우, 자동으로 Login Page를 띄어준다.
- Authentication(인증): 사용자가 입력한 id/pw가 일치하는지 Authentication Providers(DB)를 통해 확인한다.
- id/pw가 일치하지 않으면 1, 2번을 반복한다.
- 인증과 권한이 통과가 되면 Secured Area에 접근을 허용한다.
Spring Security 사용법
1. 필요한 Library
<properties>
        <org.springframework-version>5.1.3.RELEASE</org.springframework-version>
        <org.springsecurity-version>4.2.3.RELEASE</org.springsecurity-version>
</properties>

<dependencies>
    <dependency>
        <groupId>org.springframework.security</groupId>
        <artifactId>spring-security-core</artifactId>
        <version>${org.springsecurity-version}</version>
    </dependency>
    <dependency>
        <groupId>org.springframework.security</groupId>
        <artifactId>spring-security-web</artifactId>
        <version>${org.springsecurity-version}</version>
    </dependency>
    <dependency>
        <groupId>org.springframework.security</groupId>
        <artifactId>spring-security-config</artifactId>
        <version>${org.springsecurity-version}</version>
    </dependency>
</dependencies>
- 사용하는 버전에 주의한다. (여기서는 Spring Security 4를 기준으로 작성)
2. Spring Security 활성화
- Spring Security는 DelegatingFilterProxy를 사용한다.
- DelegatingFilterProxy는 모든 요청을 가로채는 Filter이다.
- 이 Filter를 web.xml에 추가한다.
<filter>
    <filter-name>springSecurityFilterChain</filter-name>
    <filter-class>org.springframework.web.filter.DelegatingFilterProxy</filter-class>
</filter>
<filter-mapping>
    <filter-name>springSecurityFilterChain</filter-name>
    <url-pattern>/*</url-pattern>
</filter-mapping>
<filter-name>: 이 이름으로 등록된다.<filter-class>: Filter로 사용할 클래스<filter-mapping>: 위에서 설정한 Filter 이름과 url을 mapping한다. (“/*”: 모든 request)- 이 Filter를 이용하면 Spring이 요청을 가로채서 해당 사용자의 인증, 권한을 알아서 확인해준다.
- 사용자가 입력한 정보와 DB에 저장되어 있는 정보를 비교한 후 알아서 인증, 권한을 확인한다.
- 단, App마다 달라지는 부분은 우리(개발자)가 알아서 처리한다.
3. Spring Security 설정
web.xml 설정
<!-- web.xml -->
<context-param>
    <param-name>contextConfigLocation</param-name>
    <param-value>
        /WEB-INF/applicationContext.xml
        /WEB-INF/securityContext.xml
    </param-value>
</context-param>
<listener>
    <listener-class>org.springframework.web.context.ContextLoaderListener</listener-class>
</listener>
- web.xml의 contextConfigLocation에 securityContext.xml을 추가한다.
- 그래야 나중에 ContextLoaderListener에 의해 등록된 설정 파일을 읽을 수 있다.
securityContext.xml 설정

# 1. beans에 추가할 설정
<!-- securityContext.xml -->
<?xml version="1.0" encoding="UTF-8"?>
<beans xmlns="http://www.springframework.org/schema/beans"
       xmlns:xsi="http://www.w3.org/2001/XMLSchema-instance"
       xmlns:security="http://www.springframework.org/schema/security"
       xsi:schemaLocation="http://www.springframework.org/schema/beans
       http://www.springframework.org/schema/beans/spring-beans.xsd
       http://www.springframework.org/schema/security
       http://www.springframework.org/schema/security/spring-security.xsd">

       ...
</beans>
- beans에 추가할 설정
xmlns:security="http://www.springframework.org/schema/security"- 내가 설정한 약어: security
xsi:schemaLocation="http://www.springframework.org/schema/security http://www.springframework.org/schema/security/spring-security.xsd"
# 2. Authentication(인증) 설정
<!-- Authentication(인증) 설정 -->

<!--방법 1. User Authentication with In-Memory definition-->
<security:authentication-manager>
    <security:authentication-provider>
        <security:user-service>
            <security:user name="admin" password="1234" authorities="ROLE_ADMIN"/>
            <security:user name="testUser" password="test" authorities="ROLE_USER"/>
        </security:user-service>
    </security:authentication-provider>
</security:authentication-manager>

<!--방법 2. Other Authentication Provider (Using Database)-->
<security:authentication-manager>
    <security:authentication-provider>
    <security:jdbc-user-service
        data-source-ref="dataSource"
        users-by-username-query="select username, password, enabled from users where username=?"
        authorities-by-username-query="select username, authority from authorities where username=?"/>
    </security:authentication-provider>
</security:authentication-manager>
<authentication-manager>- 요청의 인증을 처리한다.
<authentication-provider>가 제공하는 메커니즘을 사용하여 사용자를 인증한다.
- 인증 처리를 할 사용자 정보를 가져오는 방법 2가지
- 1) 메모리
- 2) DB
- 모두 있어도 상관없다.
<security:user-service>- test를 위해 메모리 상에 일시적으로 하드 코드된 사용자를 정의한다.
- 이름은 “admin”, 비밀번호는 “1234”인 사용자에게 “ROLE_ADMIN” 권한 부여
- 이름은 “admtestUserin”, 비밀번호는 “test”인 사용자에게 “ROLE_USER” 권한 부여
- test를 위해 메모리 상에 일시적으로 하드 코드된 사용자를 정의한다.
<security:jdbc-user-service>- DB에 사용자 계정 정보를 저장한다.

- table은 개발자가 설계한다.
- 여기서는 계정 정보 테이블과 권한 정보 테이블을 만들었다.
- 이 정보들은 사용자가 회원가입할 때 저장해야하는 정보들이다.
data-source-ref="dataSource"- DB 접근을 위한 명시
- 데이터베이스 정보를 추출하기 위해 수행할 구체적인 쿼리를 정의한다.
- 아래의 쿼리는 Default로 설정되어 있다. (명시하지 않아도 됨)
- Spring Security가 인증, 권한을 확인하기 위한 사용자의 정보들을 가져오기 위해서 Spring에게 해당 쿼리문을 수행하라고 명시하는 것이다.
- 1)
users-by-username-query="select username, password, enabled from users where username=?"- 사용자가 입력한 username 정보를 바탕으로 인증을 위한 username, password, enabled 정보를 가져온다.
- 2)
authorities-by-username-query="select username, authority from authorities where username=?"- 사용자가 입력한 username 정보를 바탕으로 접근 제어를 위한 authority(권한 정보)을 가져온다.
- 아래의 쿼리는 Default로 설정되어 있다. (명시하지 않아도 됨)
- 이후에는 사용자가 입력한 정보와 DB에 저장되어 있는 정보를 비교하여 Spring Security가 알아서 인증, 권한을 확인한다
- DB에 사용자 계정 정보를 저장한다.
# 3. Authorization(권한)
<!-- Authorization(권한) 설정 -->
<security:http auto-config="true" use-expressions="true">
    <security:intercept-url pattern="/secured/**" access="hasRole('ROLE_USER')" />
    <security:intercept-url pattern="/admin/**" access="hasRole('ROLE_ADMIN')" />
    <security:intercept-url pattern="/login" access="permitAll()" />
    <security:intercept-url pattern="/" access="permitAll()" />
    <security:intercept-url pattern="/resources/**" access="permitAll()" />
    <security:intercept-url pattern="/**" access="denyAll()" />
    <security:form-login login-page="/login" />
</security:http>
auto-config="true"- form 기반 로그인, 기본 인증 및 로그 아웃 메커니즘을 자동으로 활성화한다.
use-expressions="true"- Spring EL Expressions 사용을 활성화한다. (아래 참고)
<security:intercept-url>- 보안이 필요한 요청 URL에 대한 패턴을 정의한다.
access속성(use-expressions)- 해당 패턴과 일치하는 요청된 URL을 볼 수 있는 권한이 있는 사용자의 역할을 정의한다.
- 권한은 특정 사용자에게 할당된 역할 목록을 쉼표로 분리하여 사용할 수 있다.
<security:form-login>- default settings을 오버라이딩한다.
login-page="/login"- Defalt 페이지인 Spring Login Form이 아닌 사용자가 정의한 Custom Login Form을 사용한다. (아래 참고)
(참고) Expression-Based Access Control
- Authorization(접근 제어) 메커니즘으로서 Spring EL Expressions를 사용한다.
| Expression | Description |
| hasRole([role]) | 현재 로그인한 주체(principal)가 권한을 가지고 있으면 true 반환 |
| hasAnyRole([role1,role2]) | 현재 로그인한 주체가 제공된 권한 중 하나라도 가지고 있으면 true 반환 (쉼표로 여러 개의 권한 목록 지정 가능) |
| principal | 현재 로그인한 사용자를 나타내는 객체에 직접 액세스할 수 있다. |
| authentication | SecurityContext에서 얻은 현재 Authentication 객체에 직접 액세스할 수 있다. |
| permitAll | 모든 사용자 접근 가능 (Always evaluates to true) |
| denyAll | 모든 사용자 접근 불가능 (Always evaluates to false) |
| isAnonymous() | 현재 로그인한 사용자가 익명 사용자(anonymous user)인 경우 true 반환 |
| isRememberMe() | 현재 로그인한 사용자가 기억하고 있는 사용자(remember-me user)인 경우 true 반환 |
| isAuthenticated() | 현재 로그인한 사용자가 익명이 아닌 경우 true 반환 (인증만 되어 있으면 접근 허용) |
| isFullyAuthenticated() | 현재 로그인한 사용자가 익명 또는 기억하고 있는 사용자가 아닌 경우 true 반환 |
(참고) Custom Login/Logout Form
- default settings을 오버라이딩
<security:form-login login-page="/login" />- 내가 정한 URL을 처리할 Login Controller(@GetMapping)을 만든다.
- Custom Loing Page(login.jsp)를 만든다.
1. securityContext.xml 설정
<security:form-login>- default settings을 오버라이딩한다.
- Defalt 페이지인 Spring Login Page가 아닌 사용자가 정의한 Custom Login Page를 사용한다.
<security:form-login login-page="/login" />
security:form-loginattribute (Spring Security 4)login-page="/login"는 Spring Security을 지시한다.- 인증 절차를 처리할 URL(/login)을 정한다.
- 개발자가 임의로 결정할 수 있다.
- 접근 제어에 따라 사용자의 인증 절차가 필요한 경우 브라우저를 해당 URL(“/login”)으로 redirect한다.
- return redirect:/login; [GET]
- 해당 요청을 처리할 LoginController는 로그인 페이지를 렌더링하는 login.jsp를 반환한다.
authentication-failure-url="/login?error"- 특별히 지정하지 않아도 Default로 설정되어 있다.
- 관례상 error =1을 넣기도 한다.
- 사용자가 잘못된 사용자 이름과 암호로 로그인하려고 하면 동일한 로그인 페이지로 가되, 인증 실패를 알리기 위해 URL 뒤에 error라는 request parameter를 붙여 성공과 구분한다.
- 즉, 인증 시도가 실패하면 브라우저를 “/login?error”로 redirect한다.
- return redirect:/login?error; [GET]
- 마찬가지로 해당 요청을 처리할 LoginController는 실패 메시지를 Model에 담아 login.jsp를 반환한다.
- 특별히 지정하지 않아도 Default로 설정되어 있다.
security:logoutattribute (Spring Security 4)logout-success-url="/login?logout"- 특별히 지정하지 않아도 Default로 설정되어 있다.
- 사용자가 성공적으로 로그아웃하면 브라우저를 “/login?logout”로 redirect한다.
- return redirect:/login?logout; [GET]
- 마찬가지로 해당 요청을 처리할 LoginController는 로그아웃 확인 메시지를 Model에 담아 login.jsp를 반환한다.
security:form-login attribute (Spring Security 4)
| Attribute | Default value | Note |
| login-page | /login | implement |
| username-parameter | username | |
| password-parameter | password | |
| login-processing-url | /login , POST | the URL used to process the login request by spring |
| authentication-failure-url | /login?error | implement |
security:logout attribute (Spring Security 4)
| Attribute | Default value | Note |
| logout-url | /logout, POST | Log out processing module by spring |
| logout-success-url | /login?logout | implement |
2. Controller
@Controller
public class LoginController {
    // 사용자가 입력한 정보로부터 POST 요청은 Spring Security를 거친 후 해당 메서드로 들어온다.
    @GetMapping("/login")
    public String login(@RequestParam(value="error", required=false) String error,
                        @RequestParam(value="logout", required=false) String logout,
                        Model model) {
        if(error != null) {
            model.addAttribute("errorMsg", "Invalid username and password");
        }
        if(logout != null) {
            model.addAttribute("logoutMsg", "You have been logged out successfully");
        }
        return "login"; // login.jsp(Custom Login Page)
    }
}
- POST 요청 —> Spring Security —redirect:(GET 요청)—> 내가 작성한 Controller
- POST 요청은 Spring Security에 의해 처리
- Spring Security가 “redirect:” 한 GET 요청은 내가 작성한 Controller에서 처리
- 인증 성공 시, redirect:/
- HomeController - index.jsp(Main Page) 반환
- 인증 실패 시, redirect:/login?error
- LoginController - 오류 메시지를 Model에 담아 login.jsp(Custom Login Page) 반환
- 로그아웃 성공 시, redirect:/login?logout
- LoginController - 로그아웃 확인 메시지를 Model에 담아 login.jsp(Custom Login Page) 반환
3. Custom Loing Page
- home.jsp
<!-- 로그인한 사용자가 있으면 LOGOUT이 보인다. -->
<c:if test="${pageContext.request.userPrincipal.name != null}">
    <a href="javascript:document.getElementById('logout').submit()">LOGOUT</a>
</c:if>

<!-- logout processing module of spring security 4 -->
<form id="logout" action="<c:url value="/logout" />" method="post">
    <input type="hidden" name="${_csrf.parameterName}" value="${_csrf.token}" />
</form>
- login.jsp
<h3>Custom Login with Username and Password</h3>
<!-- For logout  -->
<c:if test="${not empty logoutMsg}">
    <div style="color: #0000ff;" >
        <h3> ${logoutMsg} </h3>
    </div>
</c:if>

<!-- login processing module of spring security 4 -->
<form action="<c:url value="/login"/>" method="post">
<!-- For failed user authentication  -->
  <c:if test="${not empty errorMsg}">
    <div style="color: #ff0000;">
        <h3> ${errorMsg} </h3>
    </div>
  </c:if>

  <table>
    <tr><td>User:</td><td><input type='text' name='username' value=''></td></tr>
    <tr><td>Password:</td><td><input type='password' name='password' /></td></tr>
    <tr><td colspan='2'><input name="submit" type="submit" value="LOGIN" /></td></tr>
    <input type="hidden" name="${_csrf.parameterName}" value="${_csrf.token}"/>
  </table>
</form>
- login/logout processing module of spring security 4
action="<c:url value="/logout" />"action="<c:url value="/login" />"
- spring security에 지정되어 있는 이름이기 때문에 위의 value는 변경하면 안된다.
- 즉, 개발자가 임의로 결정할 수 없다.
- 버전마다 value가 다를 수 있다.
- 참고) CSRF(사이트 간 요청 위조, Cross-Site Request Forgery) attack
- 개념
- 웹 어플리케이션 취약점 중 하나
- 사용자가 자신의 의지와 무관하게 공격자가 의도한 행동을 하여 특정 웹 페이지를 보안에 취약하게 한다거나 수정, 삭제 등의 작업을 하게 만드는 공격 방법을 말한다.
- 방어 방법
<input type="hidden" name="${_csrf.parameterName}" value="${_csrf.token}"/>- 민감한 정보를 아둘 때 세션에 Token(임의의 난수)를 발급하여, 해당 난수가 없는 상황에서 해당 동작들이 이루어지면 요청을 거부한다.
- 개념
Spring Security Architecture (전체 과정)
- Authorization
- securityContext.xml에 권한 설정 명시
- 권한이 없는 User가 접근할 경우,
- Spring이 내부적으로 Defalt 페이지인 Spring Login Page로 redirect한다.
- 참고) 사용자가 설정한 Login Page로 redirect하는 경우, 설정 파일(securityContext.xml)의 권한 설정에 아래 내용 추가
<security:form-login login-page="/login" />
- Authentication
- 사용자가 입력한 id/pw가 일치하는지 Authentication Providers(DB)를 통해 확인한다.
- id/pw가 일치하지 않으면 1, 2번을 반복한다.
- 인증과 권한이 통과가 되면 Secured Area에 접근을 허용한다.
- Login한 사용자가 인증, 권한에 대해 모두 성공하면 원래의 URL(Secured Page)로 redirect한다.
사용자 동작에 따른 전체 과정 설명
사용자 흐름에 따른 전체 과정 요약
- 사용자가 로그인 정보를 입력하고 Submit하면 /login URL로 POST 요청이 날아간다.
- 이후에는 Spring Security에 의해 Login/Logout Process를 거친다.
- Spring Security가 인증 결과에 따라 적절하게 redirect: 를 반환한다.
- 인증 성공 시, redirect:/
- 인증 실패 시, redirect:/login?error
- 로그아웃 성공 시, redirect:/login?logout
- Spring Security가 인증 결과에 따라 적절하게 redirect: 를 반환한다.
- Controller에서 해당 redirect GET 요청을 받아 처리한다.
- 인증 성공 시, HomeController에서 return index.jsp(Main Page)
- 인증 실패 시, LoginController에서 오류 메시지를 Model에 담아 return login.jsp(Custom Login Page)
- 로그아웃 성공 시, LoginController에서 로그아웃 확인 메시지를 Model에 담아 return login.jsp
- 참고) POST 요청 —> Spring Security —redirect:(GET 요청)—> 내가 작성한 Controller
- POST 요청은 Spring Security에 의해 처리
- Spring Security가 “redirect:” 한 GET 요청은 내가 작성한 Controller에서 처리
로그인 인증 성공/실패
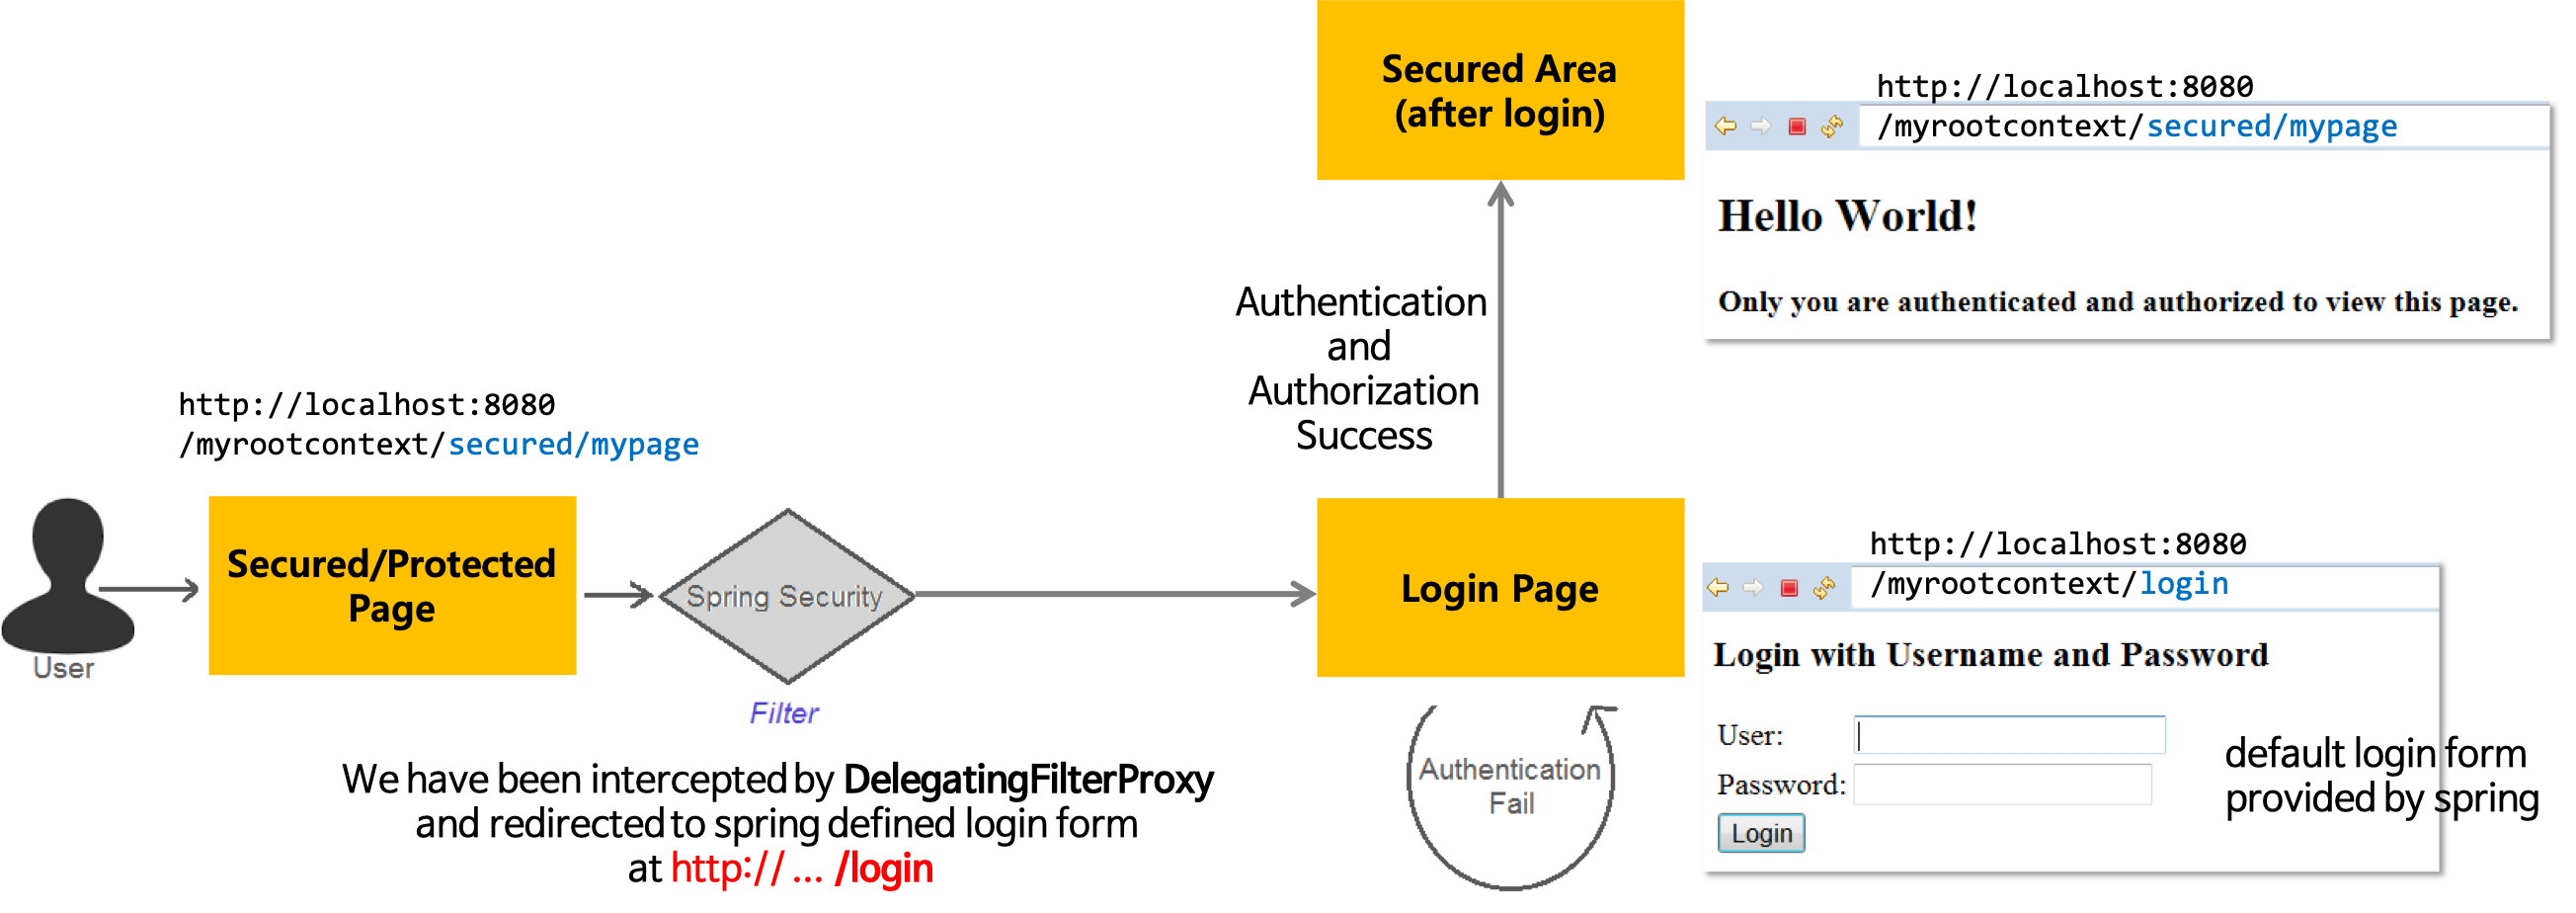
- home.jsp에서 Secured Page(Ex. Admin Page) 이동 클릭 [GET]
- 접근 제어에 따라 사용자 인증 절차 필요 (Ex. ROLE_ADMIN 사용자만 가능)
login-page="/login"에 의해 Spring Security가 브라우저를 “/login”로 redirect- 참고) 이때, login-page의 URL은 개발자가 임의로 정할 수 있다.
- return redirect:/login; [GET]
- 개발자가 작성한 LoginController login method [GetMapping]
- return login.jsp (Custom Login Page)
- login.jsp에서 사용자 정보 입력 후 LOGIN을 Submit [POST]
<form action="<c:url value="/login"/>" method="post">- 참고) 이때, value 값은 개발자가 임의로 정할 수 없다. (spring security에 지정되어 있는 이름)
- Spring Security login method [PostMapping] 실행
- 인증 절차 성공:
- redirect:/ [GET] (원래의 URL(Secured Page)로 redirect)
- -> HomeController [GetMapping]에서 return index.jsp
- 6번으로 넘어가지 않는다.
- 인증 절차 실패:
- request parameter에 error 추가
- return redirect:/login?error; [GET]
- 인증 절차 성공:
- LoginController login method [GetMapping] 실행
- error request parameter 유무 체크
- Model에 errorMsg 저장
- return login.jsp
- login.jsp에서 errorMsg 표시
로그아웃 인증 성공
- home.jsp에서 LOGOUT을 Submit [POST]
<form id="logout" action="<c:url value="/logout" />" method="post">- 참고) 이때, value 값은 개발자가 임의로 정할 수 없다. (spring security에 지정되어 있는 이름)
- Spring Security logout method [PostMapping] 실행
- 로그아웃 성공:
- request parameter에 logout 추가
- return redirect:/login?lougut; [GET]
- 로그아웃 성공:
- LoginController login method [GetMapping] 실행
- logout request parameter 유무 체크
- model에 logoutSuccessMsg 저장
- return login.jsp
- login.jsp에서 logoutSuccessMsg 표시
관련된 Post
- MVC Architecture에 대해 알고 싶으시면 MVC Architecture 이해하기를 참고하시기 바랍니다.
- Web Application Structure와 web.xml의 역할에 대해 알고 싶으시면 Web Application Structure 이해하기를 참고하시기 바랍니다.
References
- https://docs.spring.io/spring-security/site/docs/current/guides/html5/helloworld-xml.html
- https://docs.spring.io/spring-security/site/docs/current/guides/html5/form-javaconfig.html
- https://www.baeldung.com/spring-security-login
- https://github.com/spring-projects/spring-security/blob/
- schema 참고
- CSRF attack