JdbcTemplate의 사용법 기본 예제
Goal
- Spring JDBC 기본 과정에 대해 이해한다.
- JdbcTemplate의 기본 예제를 통해 사용법을 익힌다.
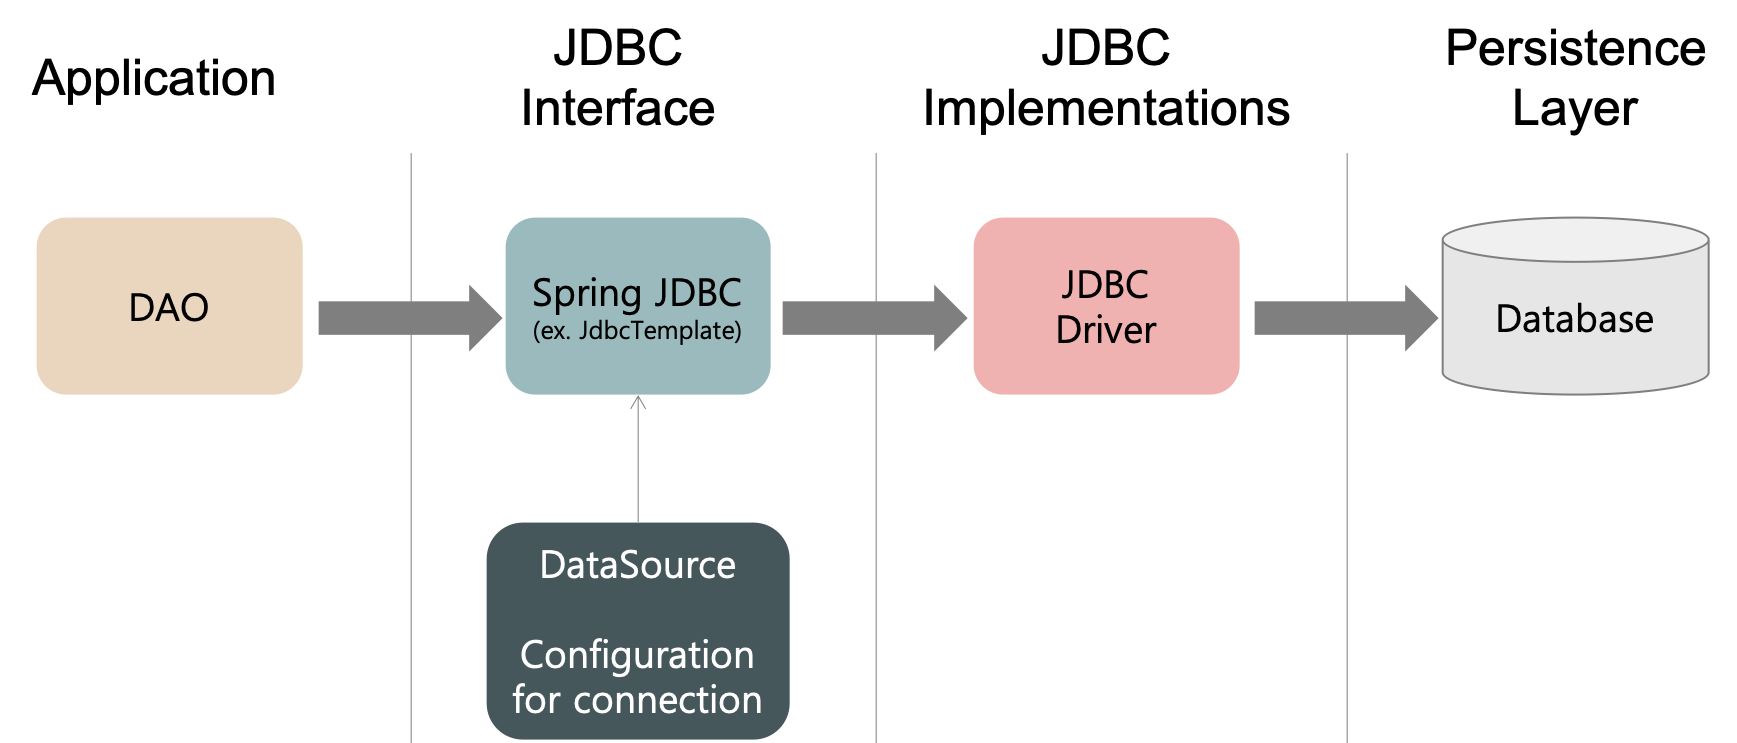
Data Access Layer 이해하기

Spring JDBC 사용 과정
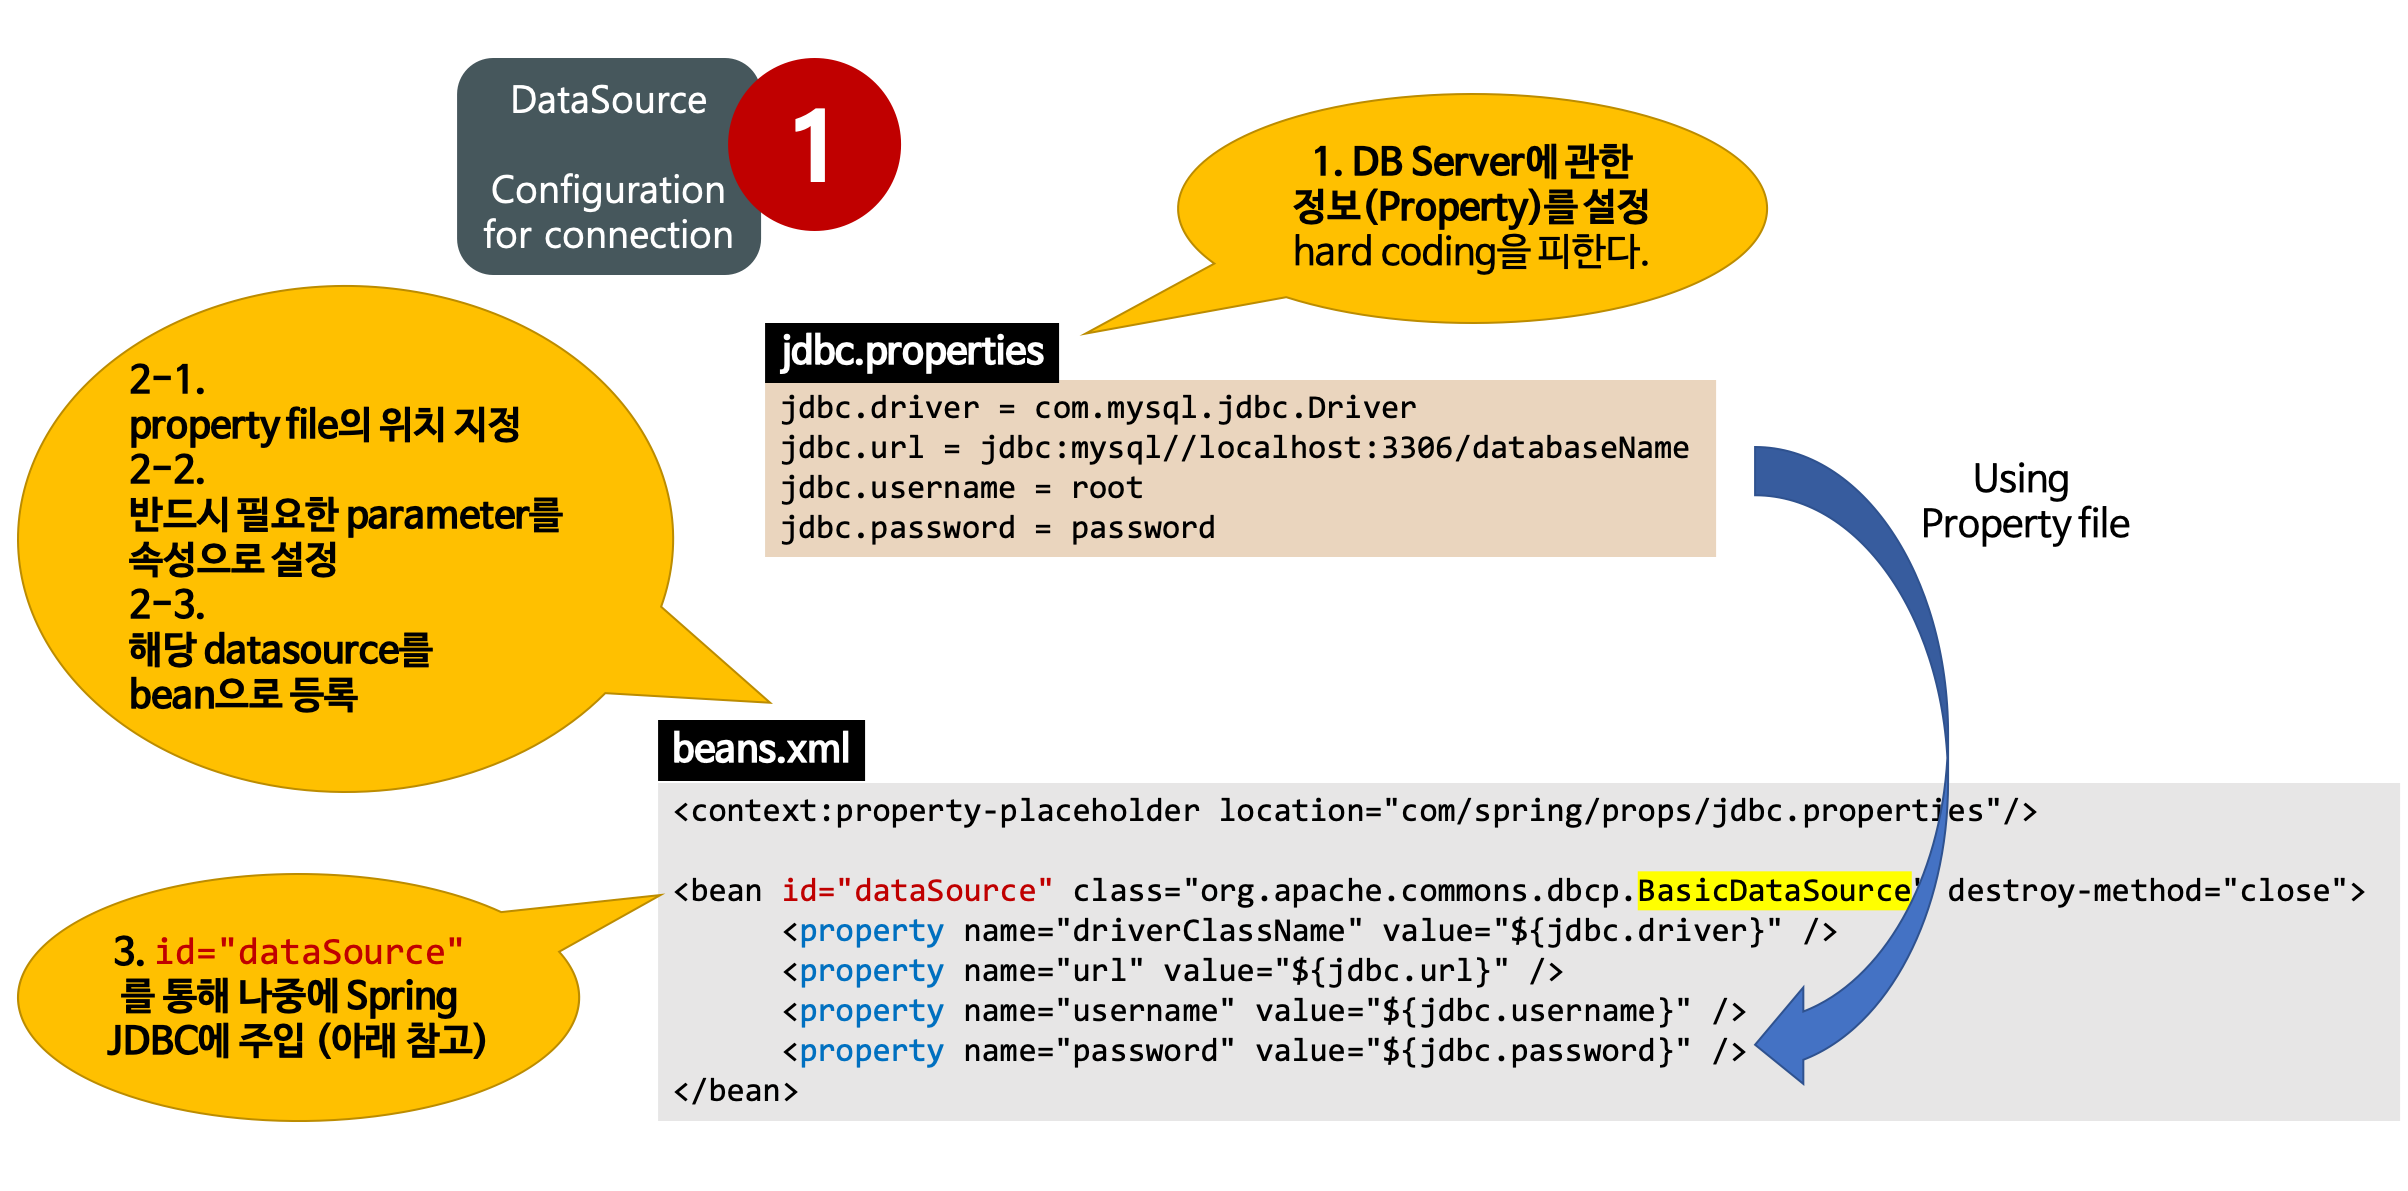
1. DataSource 설정

- DB와의 연결을 위한 DB Server에 관한 정보(Property)를 설정한다.
- 설정 정보: url, driver, username, password
- 해당 property file에 있는 값을 place holder을 통해 DataS래ucde의 속성으로 설정한 후 해당 BasicDataSource(DataSource interface 중 하나)를 bean으로 등록한다.
- Spring JDBC를 사용하려면 먼저, DB Connection을 가져오는 DataSource를 Spring IoC 컨테이너의 공유 가능한 Bean으로 등록해야 한다.
- 생성된 BasicDataSource Bean을 Spring JDBC에 주입한다.
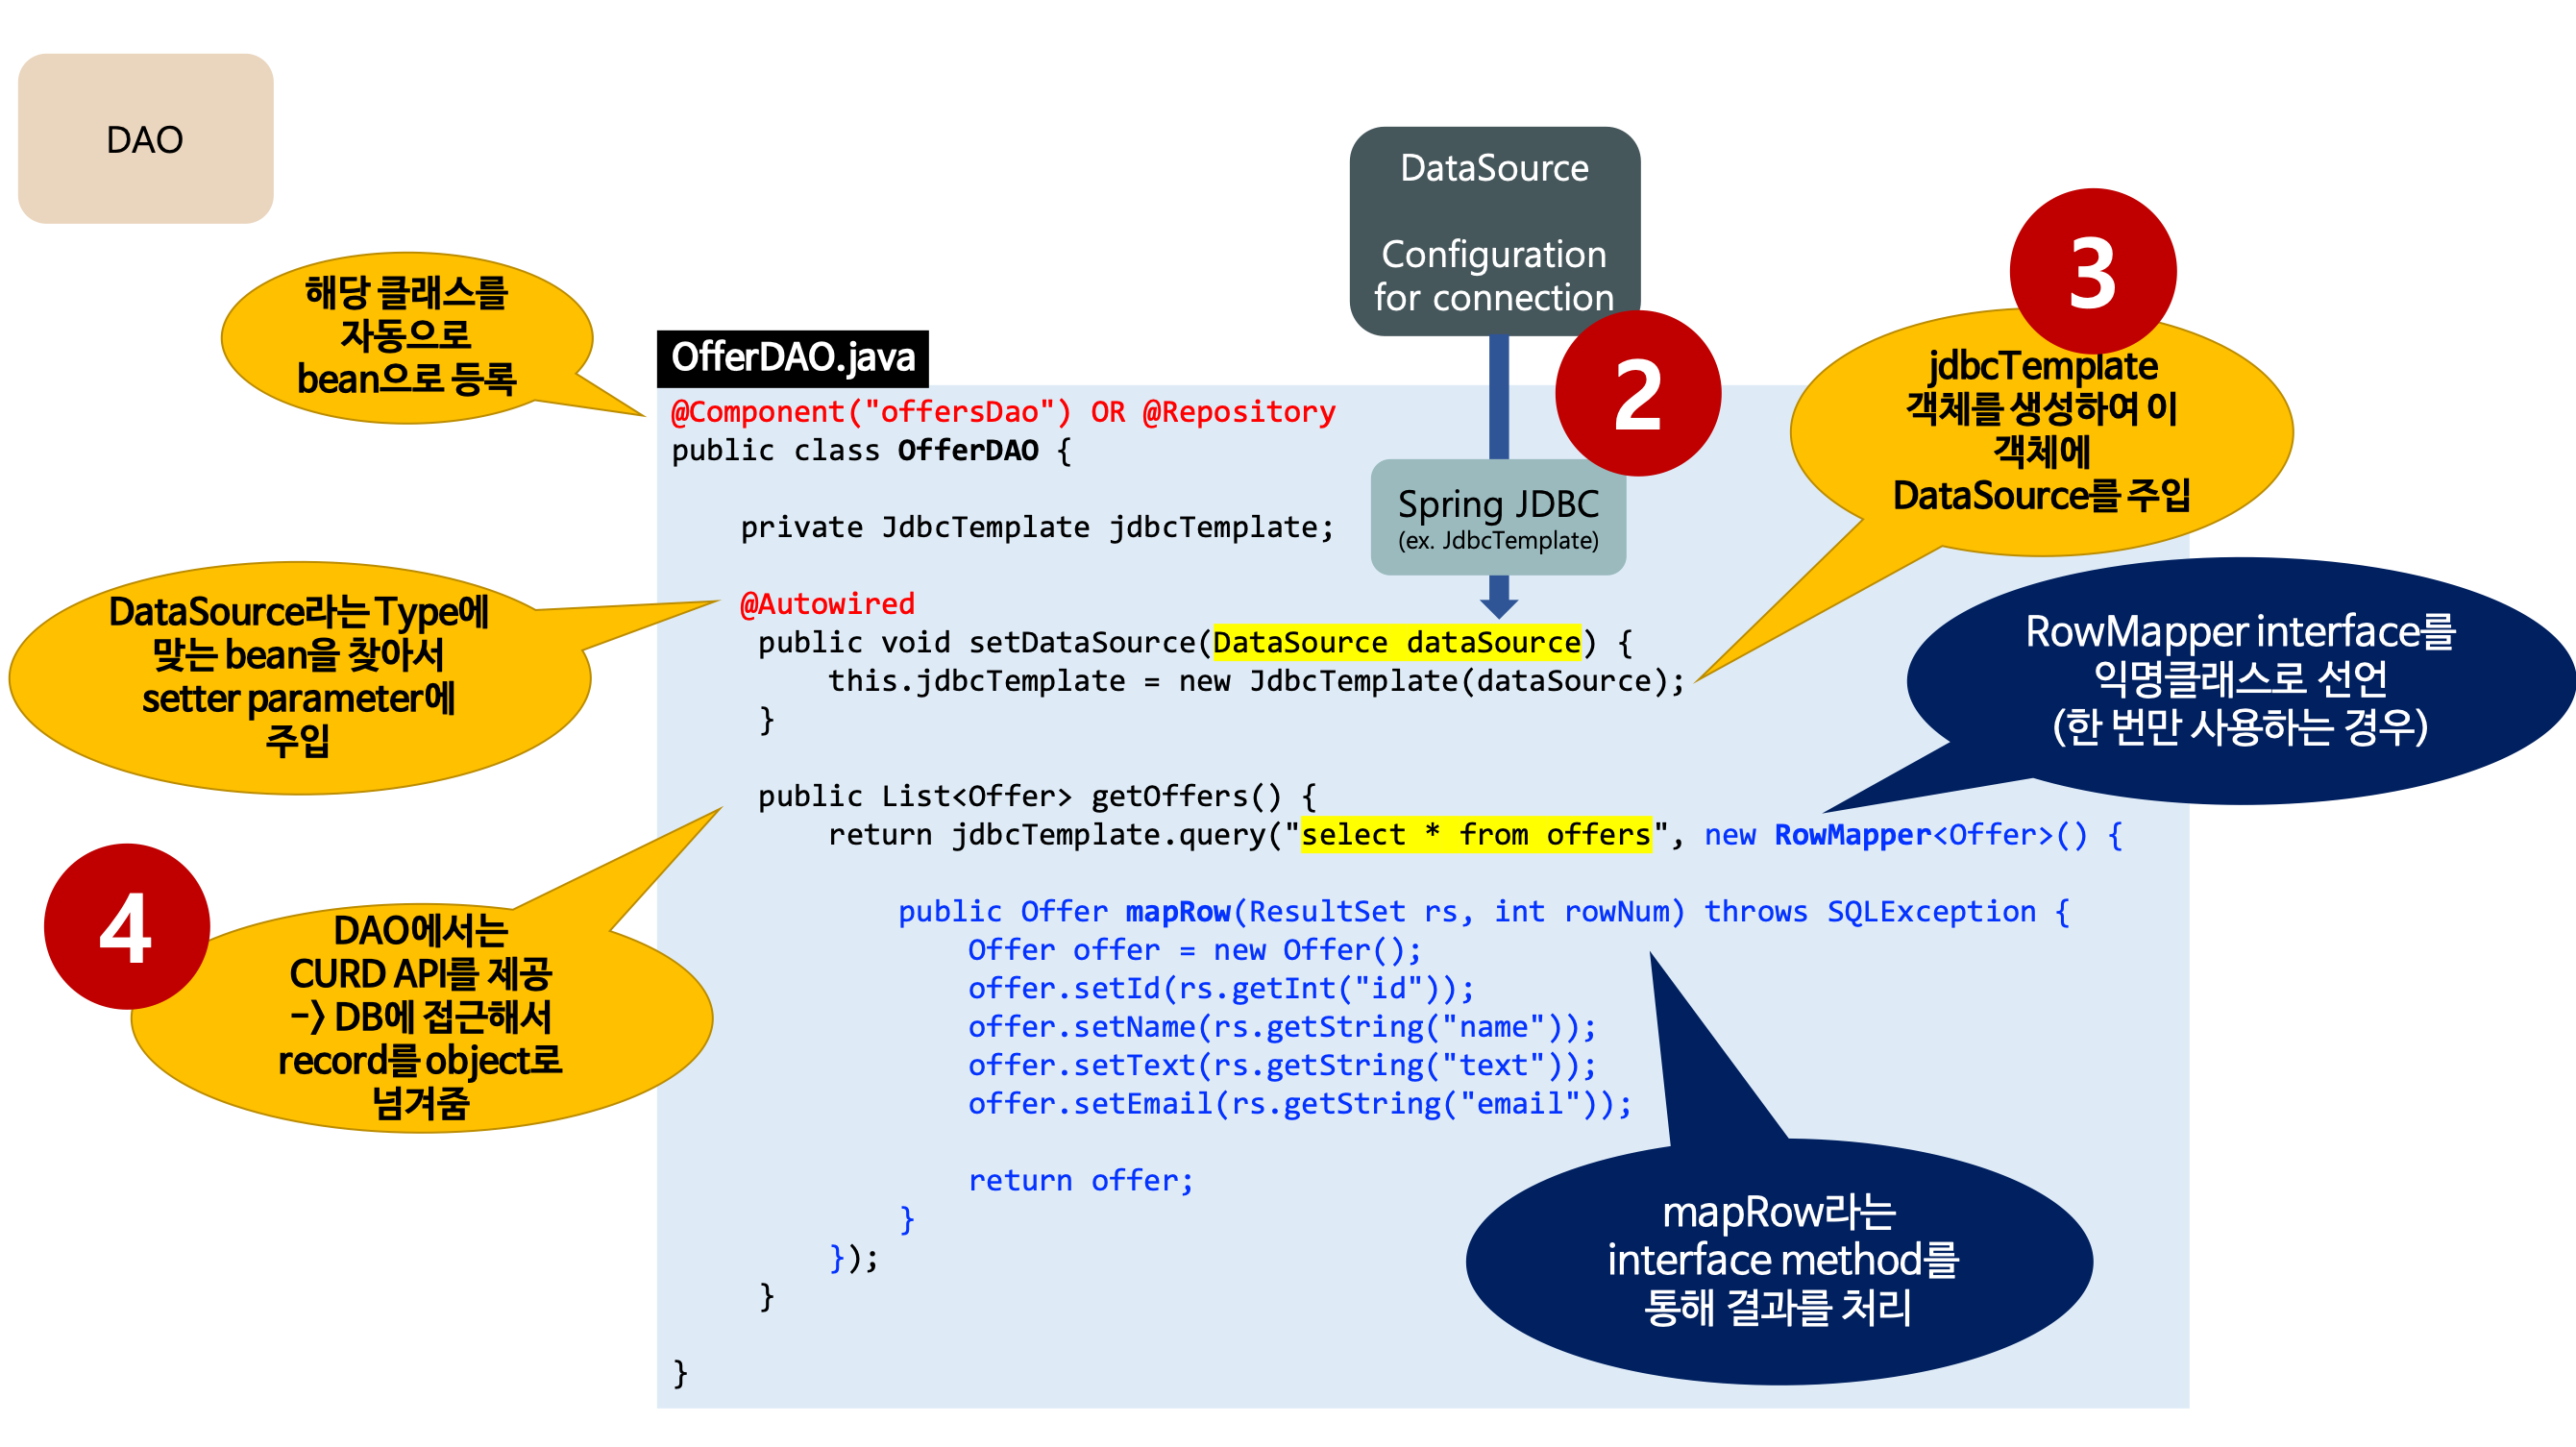
2. DAO에서의 처리 과정

- DataSource 설정(위의 과정)
- 위에서 bean으로 등록한 DataSource를 setter parameter를 통해 주입한다.
- @Autowired에 의해 DataSource Type에 해당하는 bean을 찾아서 주입한다.
- 여기서는 DataSource interface 중 하나인 BasicDataSource를 찾아서 주입한다. (위의 과정에서 등록한 bean)
- Spring JDBC 접근 방법 중 하나인 JdbcTemplate 객체를 생성하여 dataSource를 주입한다.
- CRUD API를 제공한다.
- 1) SQL문을 작성한다.
- 2) RowMapper interface 구현을 통해 SQL의 결과(record type)를 객체(object type)에 매핑하여 결과를 리턴한다.
- 개발자는 mapRow()라는 interface method를 정의하여 결과를 처리한다.
- 한 번만 사용하는 기능의 경우 RowMapper를 익명 클래스로 작성하여 사용한다.

@Component("offersDao")와 @Autowired의 기능
- 해당 annotation이 없다면 xml을 통해 직접 bean을 등록하고 setter에 주입해야 한다.
<context:property-placeholder location="com/spring/props/jdbc.properties"/>
<bean id="dataSource" class="org.apache.commons.dbcp.BasicDataSource" destroy-method="close">
    <property name="driverClassName" value="${jdbc.driver}" />
    <property name="url" value="${jdbc.url}" />
    <property name="username" value="${jdbc.username}" />
    <property name="password" value="${jdbc.password}" />
</bean>

<!-- @Component: OffersDAO 클래스를 id를 offersDao로 하는 bean으로 직접 등록 -->
<bean id="offersDao" class="com.spring.OffersDAO">
    <!-- @Autowired: id가 dataSource(ref 값)인 bean을 찾아 OffersDao의 setDataSource에 주입 -->
    <property name="dataSource" ref="dataSource" />
</bean>
- 사전에 annotation을 찾아서 bean으로 등록하기 위한 설정이 필요하다.
- 해당 annotation을 사용하면 framework이 자동으로 bean으로 등록하고 setter에 주입해준다.
<!-- Component 패키지 지정: 해당 패키지를 스캔하여 Annotation이 붙은 클래스를 bean으로 등록 -->
<context:component-scan base-package="com.spring"></context:component-scan>

<context:property-placeholder location="com/spring/props/jdbc.properties"/>
<bean id="dataSource" class="org.apache.commons.dbcp.BasicDataSource" destroy-method="close">
    <property name="driverClassName" value="${jdbc.driver}" />
    <property name="url" value="${jdbc.url}" />
    <property name="username" value="${jdbc.username}" />
    <property name="password" value="${jdbc.password}" />
</bean>

<!-- 아래와 같은 설정 필요 없음 -->
<bean id="offersDao" class="com.spring.OffersDAO">
    <property name="dataSource" ref="dataSource" />
</bean>
JDBC Template 사용법
queryForObject
- Querying for an Integer
/* 모든 학생의 수 */ String SQL = "select count(*) from Student"; int rowCount = jdbcTemplateObject.queryForObject(SQL, Integer.class); - Querying for an String
/* 해당 학번(10)에 해당하는 학생의 이름 */ String SQL = "select name from Student where id = ?"; String name = jdbcTemplateObject.queryForObject(SQL, new Object[]{10}, String.class); // 위와 동일. hard coding String name = jdbcTemplateObject.queryForObject(SQL, 10, String.class); - Querying and returning an object(하나의 객체)
/* 해당 학번(10)에 해당하는 학생 객체 */ String SQL = "select * from Student where id = ?"; Student student = jdbcTemplateObject.queryForObject(SQL, new Object[]{10}, new StudentMapper()); // RowMapper interface의 구현 클래스 정의 public class StudentMapper implements RowMapper<Student> { // interface method public Student mapRow(ResultSet rs, int rowNum) throws SQLException { Student student = new Student(); student.setID(rs.getInt("id")); student.setName(rs.getString("name")); student.setAge(rs.getInt("age")); return student; } }- Integer, String은 컴파일러가 해당 타입에 맞게 알아서 매핑해주지만 우리가 만든 객체는 알 수 없기 때문에 직접 Mapping Logic을 구현해야 한다.
query
- Querying and returning multiple objects(여러 개 객체)
/* 모든 학생 객체 */
String SQL = "select * from Student";
List<Student> students = jdbcTemplateObject.query(SQL, new StudentMapper());
// RowMapper interface의 구현 클래스 정의
public class StudentMapper implements RowMapper<Student> {
  // interface method
  public Student mapRow(ResultSet rs, int rowNum) throws SQLException {
      Student student = new Student();

      student.setID(rs.getInt("id"));
      student.setName(rs.getString("name"));
      student.setAge(rs.getInt("age"));

      return student;
  }
}
update
- Inserting a row into the table
/* 이름이 Zara, 학번이 11인 학생을 삽입 */ String SQL = "insert into Student (name, age) values (?, ?)"; jdbcTemplateObject.update(SQL, new Object[]{"Zara", 11}); - Updating a row into the table
/* 학번이 10인 학생의 이름은 Zara로 수정 */ String SQL = "update Student set name = ? where id = ?"; jdbcTemplateObject.update(SQL, new Object[]{"Zara", 10}); - Deleting a row into the table
/* 학번이 20인 학생을 삭제 */
String SQL = "delete from Student where id = ?";
jdbcTemplateObject.update(SQL, new Object[]{20});
관련된 Post
- Data Access Layer에 대해 알고 싶으시면 Data Access Layer 이해하기를 참고하시기 바랍니다.
- Annotation 활성화에 대해 알고 싶으시면 Spring Annotation 활성화를 참고하시기 바랍니다.


