Dependency Injection을 이해한다.
Goal
- Object Dependencies을 이해한다.
- Dependency Injection의 개념과 장점을 이해한다.
- Spring Container를 이해한다.
- 구체적인 예시를 확인한다.
Object Dependencies(객체 의존성)
현재 객체가 다른 객체와 상호작용(참조)하고 있다면 현재 객체는 다른 객체에 의존성을 가진다.
public class PetOwner{
    private AnimalType animal;

    public PetOwner() {
        this.animal = new Dog();
    }
}
- PetOwner 객체는 AnimalType 객체(Dog)에 의존한다.
- PetOwner 생성자에서
new Dog();를 통해 Dog에 의존성을 가진다.
- PetOwner 생성자에서
- 이 접근법의 문제점(의존성이 위험한 이유)
- PetOwner 객체는 AnimalType 객체의 생성을 제어하기 때문에 두 객체 간에는 긴밀한 결합(tight coupling)이 생기고, tight coupling에 따라 AnimalType 객체를 변경하면 PetOwner객체도 변경된다.
- 즉, 하나의 모듈이 바뀌면 의존한 다른 모듈까지 변경 되어야 한다.
- 또한 두 객체 사이의 의존성이 존재하면 Unit Test 작성이 어려워 진다.
Dependency Injection(의존성 주입)
객체 자체가 아니라 Framework에 의해 객체의 의존성이 주입되는 설계 패턴
- Framework에 의해 동적으로 주입되므로 여러 객체 간의 결합이 줄어든다.
- Dependency Injection은 Spring Framework에서 지원하는 IoC의 형태

- 설정에 명시된대로 Container가
- 1) bean 객체를 생성하고
- 2) 종속성 주입을 수행한다.
- Dependency Injection(의존성 주입)과 Inversion Of Control(제어의 역전)은 같은 의미로 사용된다.
- IoC는 DI를 통해 달성된다.
- IoC(제어의 역전): 프로그램 제어권을 framework가 가져가는 것
- 개발자가 모든 제어의 중심이지만 코드 전체에 대한 제어는 framework가 한다.
- 개발자가 설정(xml, annotation 등)만 하면 Container가 알아서 처리한다.
- 즉, 우리는 Framework 속에서 프로그래밍을 하는 것.
의존성 주입 방법 (세 가지)
- Contructor Injection
- 생성자를 통한 전달
<constructor-arg ref="cat"></constructor-arg>
- Method(Setter) Injection
- setter()을 통한 전달
<property name="myName" value="poodle"></property>
- Field Injection
- 멤버 변수를 통한 전달
장점
- Reduced Dependencies
- 종속성이 감소한다.
- components의 종속성이 감소하면 변경에 민감하지 않다.
- More Reusable Code
- 재사용성이 증가한다.
- 일부 인터페이스의 다른 구현이 필요한 경우, 코드를 변경할 필요없이 해당 구현을 사용하도록 components를 구성할 수 있다.
- More Testable Code
- 더 많은 테스트 코드를 만들 수 있다.
- Mock 객체는 실제 구현의 테스트로 사용되는 객체
- 종속성을 components에 주입할 수 있는 경우 이러한 종속성의 Mock 구현을 주입할 수 있다.
- 예를 들어, Mock 객체가 올바른 객체를 반환할 때, null을 반환할 때, 예외가 발생할 때 모두 처리한다.
- More Readable Code
- 코드를 읽기 쉬워진다.
- components의 종속성을 보다 쉽게 파악할 수 있으므로 코드를 쉽게 읽을 수 있다.
간단한 예시
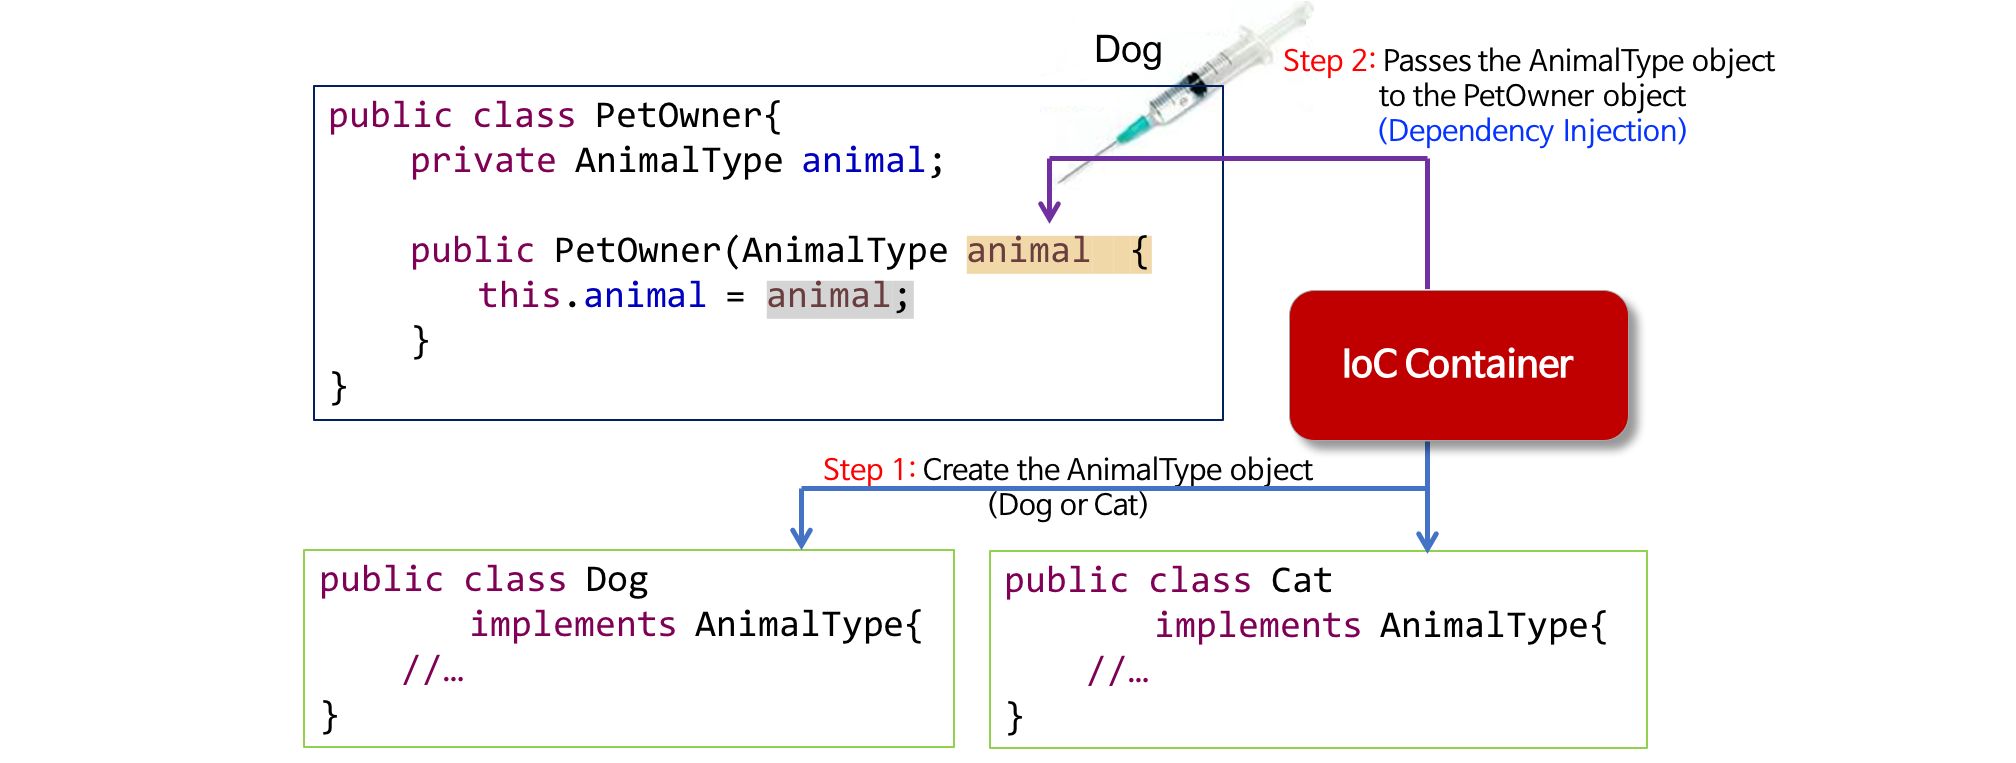
- AnimalType에 대한 구체적인 Class를 생성한다.
- Dog Class, Cat Class
- PetOwner 객체에 AnimalType 객체를 전달한다.
- Contructor Injection
- 생성자를 통한 전달
<constructor-arg ref="cat"></constructor-arg>
- Method(Setter) Injection
- setter()을 통한 전달
<property name="myName" value="poodle"></property>
- Field Injection
- 멤버 변수를 통한 전달
- Contructor Injection
- 개발자가 할 일은
- 주입할 것에 대한 Class를 작성(Dog, Cat 등)하는 것
- 어떤 것을 주입할 건지를 결정할 설정 파일(xml, annotation 등)을 작성하는 것
- 즉, 코드상에서는 전혀 변화가 없다.
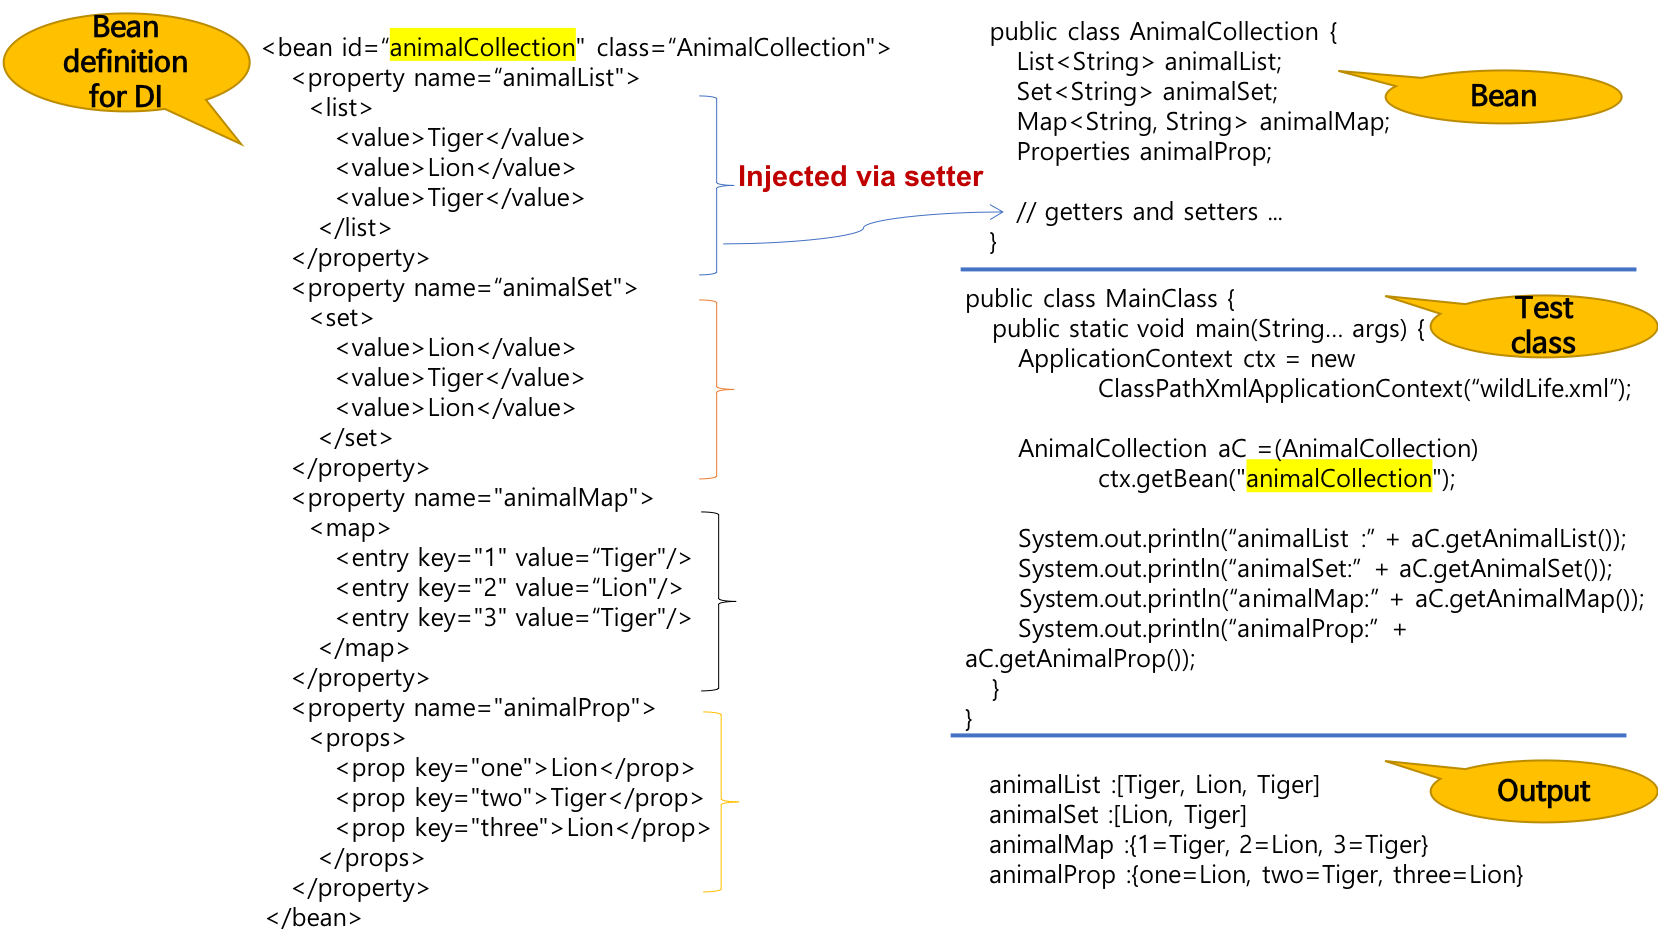
Injection Collection
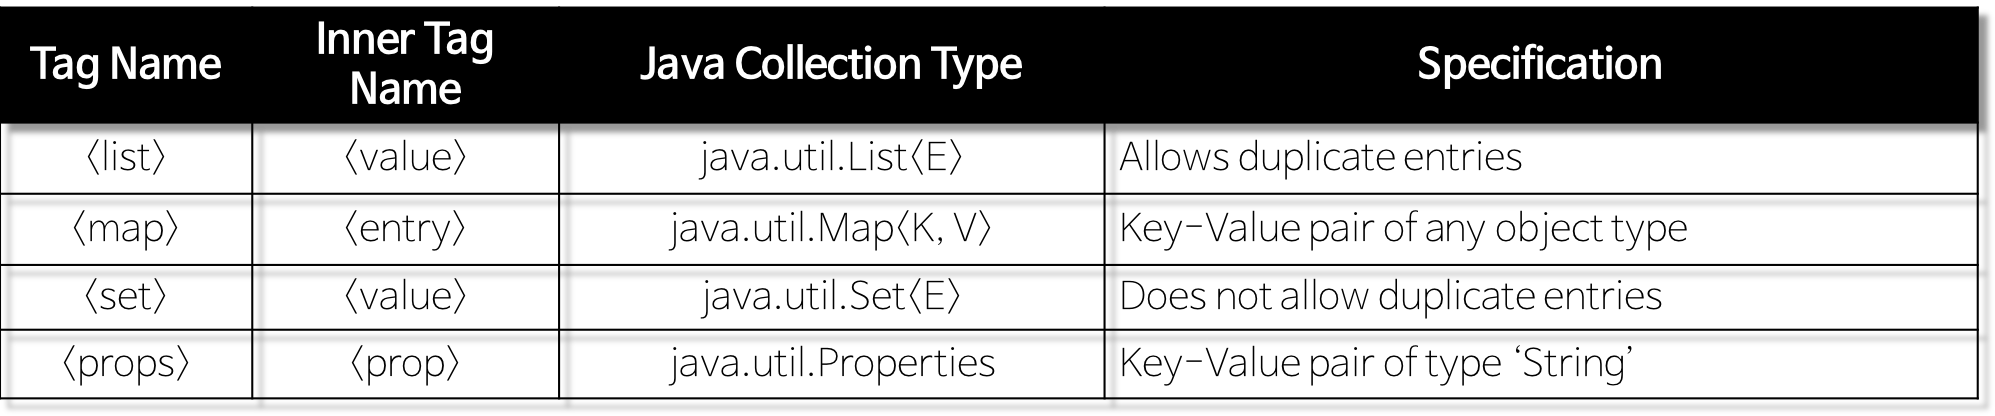
- 예시
Spring Container
Spring Framework의 핵심 컴포넌트
- Container는 DI를 사용하여 응용 프로그램을 구성하는 bean 객체를 관리한다.
역할
- bean을 포함하고 관리하는 책임이 있다.
- 객체(bean)를 생성하고
- 객체들을 함께 묶고
- 객체들을 구성하고
- 객체들의 전체 수명주기(lifecycle)를 관리
설정 방법
- Spring Container metadata 설정 방법 (세 가지)
- XML
- 1) 빈 객체 정의 (Bean Definition)
- 2) 의존성 주입 (Dependency Injection)
- Java Annotations
- Java Code
유형
- Spring Container의 2가지 유형
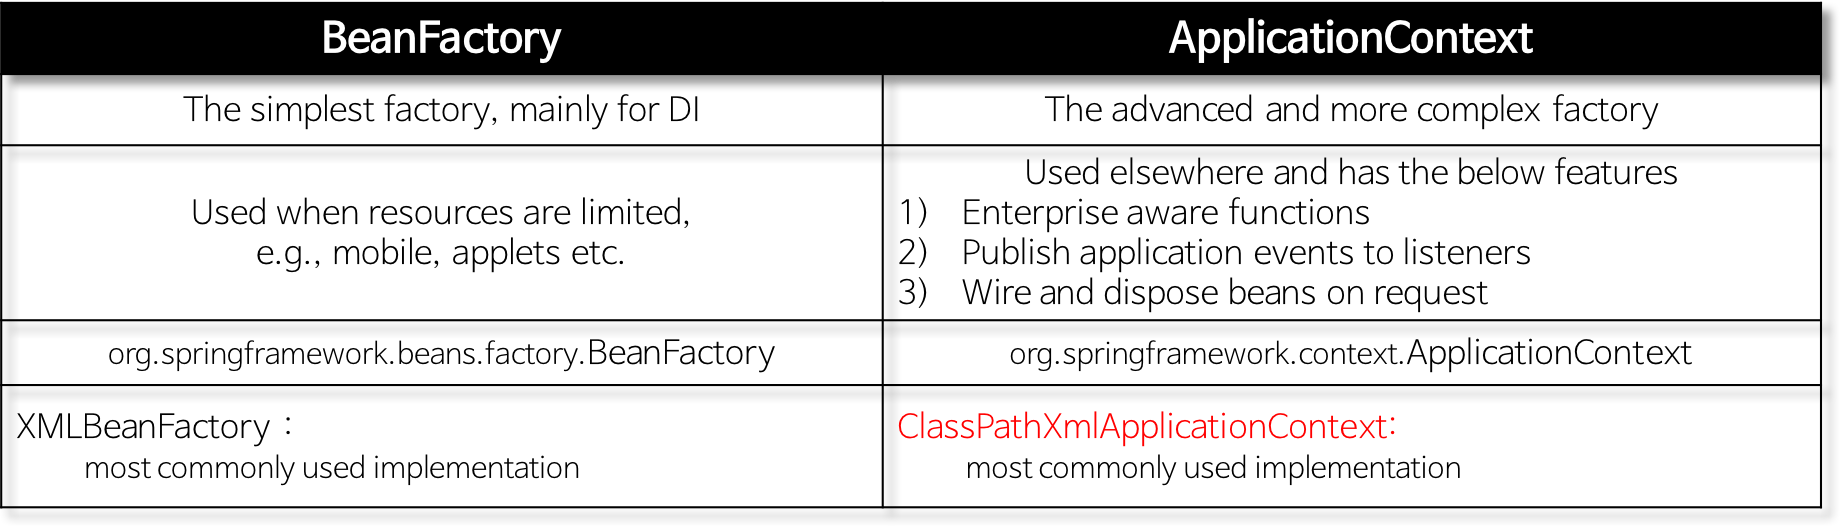
- BeanFactory
- 주로 단순한 DI에서만 사용한다.
XMLBeanFactory
- ApplicationContext
- Resources가 제한되어 있지 않은 모든 곳에 사용한다.
ClassPathXmlApplicationContext-
/* main함수에서 Contaier를 생성 */
// 설정 파일은 인자로 넣고, 해당 설정 파일에 맞게 bean들을 만든다.
ApplicationContext context =
 new ClassPathXmlApplicationContext("spring/di/beans/bean.xml");
// getBean()을 통해 bean의 주소값을 가져온다.
HelloWorld obj = (HelloWorld) context.getBean("helloWorld");
Spring Container와 DI의 예시
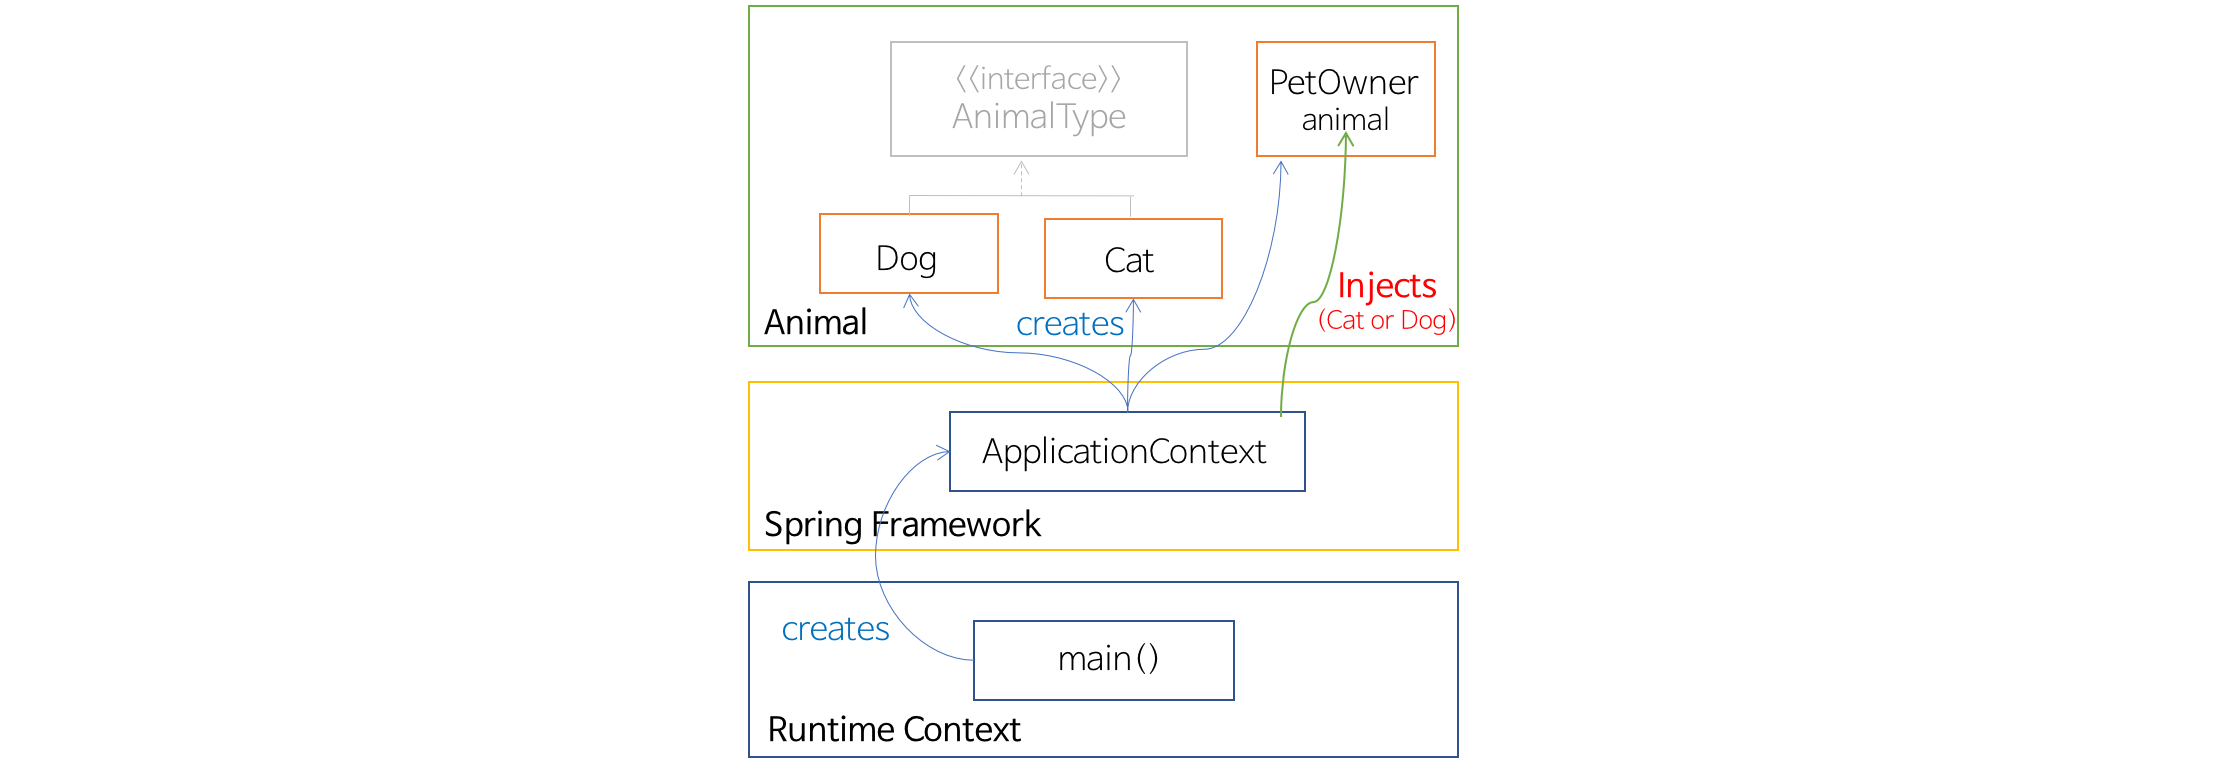
- AninalType Interface
package spring.di; public interface AninalType { public void sound(); } - AnimalType에 대한 구체적인 Class(Cat, Dog Class)
package spring.di;
public class Cat implements AninalType {
  String myName;
  public void setMyName(String name) {
      this.myName = name;
  }
  public void sound() {
      System.out.println("Cat: " + myName +
       "-Meow");
  }
}
package spring.di; public class Dog implements AninalType { String myName; public void setMyName(String name) { this.myName = name; } public void sound() { System.out.println("Dog: " + myName + "-BowWow"); } } - PetOwner Class
package spring.di; public class PetOwner { public AnimalType animal; public PetOwner(AninalType animal) { this.animal = animal; } public void play() { animal.sound(); } } - MainApp Class
package spring.di; import org.springframework.context.support.ClassPathXmlApplicationContext; public class MainApp { public static void main(String[] args) { /* main함수에서 Container를 생성 */ // 설정 파일은 인자로 넣고, 해당 설정 파일에 맞게 bean들을 만든다. ClassPathXmlApplicationContext context = new ClassPathXmlApplicationContext("spring/di/beans/animal.xml"); // getBean()을 통해 bean의 주소값을 가져온다. PetOwner person = (PerOwner) context.getBean("petOwner"); person.play(); context.close(); } } - Configure beans and dependencies (animal.xml)
- 1) 빈 객체 정의 (Bean Definition)
- 2) 의존성 주입 (Dependency Injection)
<?xml version="1.0" encoding="UTF-8"?>
<beans xmlns="http://www.springframework.org/schema/beans"
      xmlns:xsi="http://www.w3.org/2001/XMLSchema-instance"
      xmlns:context="http://www.springframework.org/schema/context"
      xsi:schemaLocation="http://www.springframework.org/schema/beans http://www.springframework.org/schema/beans/spring-beans.xsd
            http://www.springframework.org/schema/context http://www.springframework.org/schema/context/spring-context-3.2.xsd">

    <bean id="dog" class="spring.di.Dog">
        <property name="myName" value="poodle"></property>
    </bean>

    <bean id="cat" class="spring.di.Cat">
        <property name="myName" value="bella"></property>
    </bean>

    <bean id="petOwner" class="spring.di.PetOwner">
        <constructor-arg ref="cat"></constructor-arg>
    </bean>
</beans>
<bean id="dog" class="spring.di.Dog">- id=”dog”: 객체 이름
<property name="myName" value="poodle"></property>- value의 값을 해당 클래스에 선언한 setter의 인자에 주입
<bean id="petOwner" class="spring.di.PetOwner">- id=”petOwner”: 객체 이름
<constructor-arg ref="cat"></constructor-arg>- 해당 클래스의 생성자의 인자에 “cat” 객체를 주입
- ref=”dog”로 바꾸더라도 다른 Java Code에 영향을 끼치지 않는다.
- 설정 파일만 변경하면 알아서 의존성을 주입한다.
- 설정 파일에 bean 객체를 정의/등록 해두면 알아서 생성한다.
- 객체는 res로, String값은 value로 설정한다.
관련된 Post
- Web Service의 기본적인 동작 과정과 Servlet에 대해 알고 싶으시면 Servlet 이란을 참고하시기 바랍니다.
- JSP의 개념과 기본 문법에 대해 알고 싶으시면 JSP 란을 참고하시기 바랍니다.
- Servlet과 JSP의 차이에 대해 알고 싶으시면 Servlet과 JSP의 차이을 참고하시기 바랍니다.